
1.4 Safe Saddling
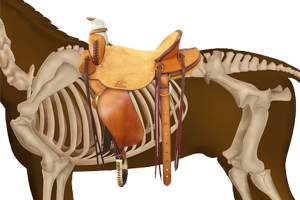
It is important to select the proper size saddle for both rider and horse. ***Why? Here is what ChatGPT says, edit away….
When using horses in feedyards, selecting the proper size saddle for both rider and horse is particularly important due to the demanding nature of the work involved. Here are key reasons specific to feedyard operations:
For the Horse:
- Extended Work Hours: Horses in feedyards often work long hours, and an ill-fitting saddle can lead to chronic discomfort and injury due to prolonged pressure on specific areas of the back.
- Varied Movements: Feedyard work involves a variety of movements such as stopping, turning, and backing up, which can exacerbate any issues caused by an improperly fitted saddle.
- Heavy Loads: The tasks may include carrying heavier loads or moving quickly, making it crucial that the saddle distributes weight evenly to prevent strain and injury.
- Stress and Fatigue: Long shifts and repetitive tasks can increase the risk of saddle sores, muscle fatigue, and other injuries if the saddle does not fit well.
For the Rider:
- Efficiency and Control: A properly fitted saddle enhances the rider’s ability to maintain control and balance, which is essential for maneuvering in tight spaces and managing livestock effectively.
- Comfort During Long Hours: Riders often spend many hours in the saddle. An improper fit can lead to significant discomfort, fatigue, and even injury, reducing the rider’s ability to perform their duties efficiently.
- Safety: The dynamic and sometimes unpredictable environment of a feedyard requires a secure and stable saddle to minimize the risk of accidents or falls.
- Performance and Precision: Effective communication with the horse is crucial for precise movements and quick responses, which is facilitated by a well-fitted saddle.
Overall Importance in Feedyards:
- Productivity: Proper saddle fit ensures both horse and rider can work efficiently and effectively, leading to higher productivity in managing feedyard operations.
- Health and Longevity: A well-fitted saddle helps maintain the health and longevity of both the horse and rider, reducing downtime due to injuries or discomfort.
- Work Environment: Ensuring comfort and safety for both horse and rider contributes to a more positive work environment, leading to better morale and performance.
- Preventing Long-term Issues: Preventing chronic issues through proper saddle fit ensures that both horse and rider can continue to work in the demanding feedyard environment without long-term detrimental effects.
Selecting the proper saddle fit is an investment in the efficiency, safety, and overall well-being of both the horse and rider in the demanding context of feedyard operations.
What types and sizes of saddles are available on your feedyard?
***Deana question – how about a video talking about saddle size??**
Next we will briefly discuss the key points for each main step in saddling a horse safely, for both the horse and the rider.
Step 1 – Preparing Horse
Leading and Tying Up Horse
- Use lead ropes that are soft – they are less likely to cause rope burns on horses and handlers.
- Lead horses from the left and to the side.
- Never wrap your arms or hands in the coils of the lead rope.
- Allow slack in the lead rope from the horse’s head to your hand.
- If tying with a lead rope, make sure it is a quick release knot and always carry a sharp knife.
- Try not to tie a horse up by the reins. Wrap lead ropes and reins as much as possible.
- Tie to something solid, not to panels or gates. Frightened horses are strong enough to pull attached panels off of posts.
- Tie high enough and short enough that the horse can’t get a leg over the lead rope.
- Don’t tie up the horse while saddling, drape the reins or lead rope over your arm.
**How about this video?? This 2 min video from Utah State University demonstrates this.**
Never wrap leads around your hand or arm.
Brushing
- Make sure the entire body of the horse has been cleaned, especially the cinch area.
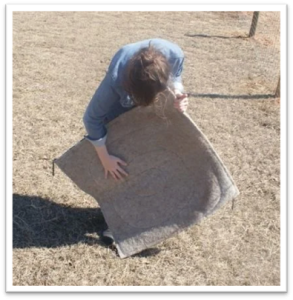
- Brush off the inside of the saddle pad to ensure that there is nothing on the pad that might cause irritation.
Step Two – Placing Saddle Pad
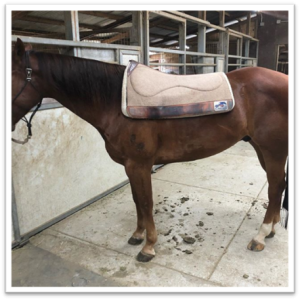
- Place the saddle pad high up on the withers, so when the saddle is placed you can slide it back in place – in the same direction as the horse’s hair lays.
- The pad should be large enough to be slightly visible from under the saddle.
- No part of the saddle should be rubbing on the horse.
- Make sure that the pad is pushed up in the gullet of the saddle to allow air to circulate to the horses back.
- **Deana question: above the text says not to tie horse when saddling, yet is this picture showing that?
Step Three – Setting Saddle on Horse
- Lay the cinch, over the seat of the saddle, and hook the right stirrup over the saddle horn.
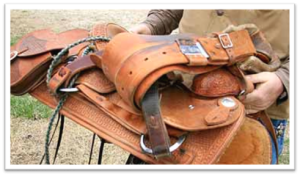
This prevents you from tripping and keeps the cinch and stirrup from hitting the horse as the saddle comes down on its back. This could scare the horse and cause it to jump into you.
- Grab the saddle by cantle and the front. Set it gently on the horse’s back.
Step Four – Cinches
 Make sure the cinches are straight.
- Start with front cinch, back cinch and then the breast collar.
- Reverse the order to take the tack off the horse.
- Make sure back cinches are snug and connected to the front one with a cinch hobble.
- Move horse around before the final cinching to avoid making “cinchy” horses.
- Make sure cinch d-rings are above the elbow on the horse to avoid cinch sores.
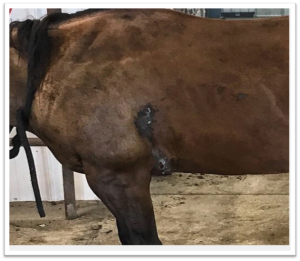
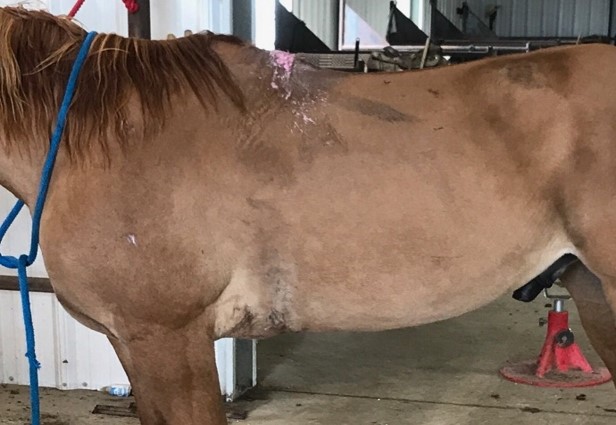
Sore Backs
- Check horses daily for sore backs and sore cinch areas.
Be sure and check horses at the end of the day for “flinch” points that might indicate a potential problem. Feel over back, cinch area, neck and legs.
This is an example of the saddle rubbing where a pad should have been protecting. This horse will need 6-8 weeks to recover.
Any videos to demonstrate these steps??
Review
Work through these interactive questions to review the important concepts discussed.