
2 Greenhouses: moving and transplanting
Cost: About $10.00 ~ $15.00 Difficulty: Low Time: Hour or so. Continuous: Yes-several weeks
Summary:
Students continue to learn the basics of how plants grow and the parts of a plant. They should have successfully grown seedlings, if they have done the previous activity, DIY Greenhouse(s). Growing larger plants in soil can be a touchy experience depending upon the group, however it can be a great learning activity and experience for students. The cost is determined by how much soil you must purchase to fill the number of cups. Speak to your local hardware, garden, supply store and they may donate plants for free. This project is can be completed over several weeks. It can be done in conjunction with other activities.
Pro-tip: Be advised. You should practice this step prior to doing it in the classroom. You may experience tremendous success or utter failure. Also, the quality of soil you can find outside varies from location to location. If you do use free dirt from outside to save on cost, test it first. Having lead or other contaminants in soil can kill plants or make them unsafe for consumption.
ELO’s – Agricultural Science, Life Science, Plant Science, life cycle, observation, discussion, building a hypothesis, critical thinking.
Supplies needed:
· Red plastic cups (or other recycled containers such as milk jugs),
· a marker (to label the type of plant in the cup and other information),
· indoor/outdoor potting soil for plants and vegetables,
· pencils & paper for writing what the students observed,
· a large tray (to put cups on and catch water),
· a water bottle/spray bottle or source of water
Activity
1) Buy red disposable cups and “indoor/outdoor potting soil” depending upon planned usage. In my experience, I find that soil that can be used for vegetables yield better results.
2) Make sure that your seedling’s stem is strong enough for the plant to stand on its own. Refer to your seed packet.
3) Take a red plastic cup and poke several holes in the bottom of it for water to flow out of the cup. (Important!) It’s important that the cups have a hole in the bottom so water can drain. If there aren’t holes in the bottom of the cup, the water will sit, and then go stale. The plant will rot, eventually die and then either you or your student will be sad. When you grow plants outside, water naturally flows in the soil or evaporates into the air.
Pro-tip: Plants need oxygen in the soil. Growing plants is a process of adding water and letting the roots dry.
4) Give the cup to a student and have student fill it ¾ of the way with soil.
5) Use a finger to make a hole large enough for the plant to fit.
6) Carefully unwrap your seedling if you are using the plant you germinated from the previous project. If you are using store bought plants or other plants, remove from trays and be careful not to damage the plant or the roots.
7) Place in plant in the cup and then use additional soil to make the seedling stand up.
8) Water the plant until water comes out of the bottom. If indoors, use a bucket to catch the runoff water, else do this part outside.
9) Place plants in an area with decent light for most of the day. Refer to your seed packet. Be aware of potential issues if putting plants outside if it’s cold or if you have issues with insects or animals.
10) This is the step that students and adults have the most issues with. Now for seedlings, they should be watered only about once every other day for most plants unless your soil gets dry quickly. Then, you may need to water every day. Refer to your seed packet. You want air to be able to get into the soil by letting it dry. Do not over water your plant! Too much water and your plant will die. Also, do not forget to water! No water equals a sad, dead plant. Choose a time to water it every day so you don’t forget.
Pro-tip: Water once a day, until runoff water comes out of the bottom of the cup. Leave the plant be, in a sunny location. If you feel tempted to water it again, try talking to your plant instead. Refer to your seed packet for additional information.
Discussion:
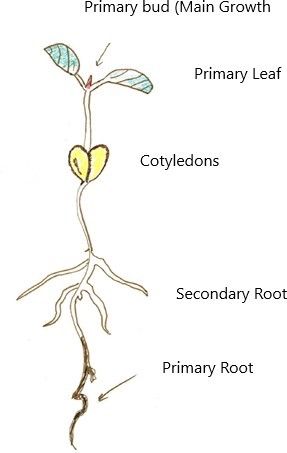
After completing this activity, have the students document what they observe. How fast is their plant growing? What kind of plant was it? Have them draw a picture and then identify the parts of a plant. Have them compare the growth of a tomato versus the growth of beans or whatever else you chose. As the plants get larger you make require additional apparatus. For example, a bean is a vine, vine plants usually need a pole or stick to grow and climb up. Do some research on the plants you used to see what they may need if you allow the students to take them home.
Pro-tip: This is one of those projects where you can use some of the donated goods you received. If you have empty milk cartons from school, milk jugs from home, etc. you can use these as pots for your plants. As the plants get larger, they will need to be transplanted again. Reference your seed packages for more information.